
This guide covers the complete end-to-end onboarding process for Snapdragon Guardian devices, including administrator setup, enrollment, discovery, group assignment, and command execution.
Overview
The onboarding process consists of the following stages:
- Initial Setup: Permission Groups, Device Groups
- Configure the Snapdragon Guardian CLI
- Onboard an OEM Key
- Harvesting: Generate Chipset Key Request
- Enrollment: Trigger Device Enrollment
- Discover and Assign Devices
- Execute Commands
- Unenroll a Device
Prerequisites
Before starting, ensure you have:
- Access to the Qualcomm Software Center to download and install the Snapdragon Guardian CLI
- Access to the Snapdragon Guardian web portal
- A superuser account in the system
- Enrollment server TLS certificate provided by your administrator (if required; see section 5.2)
1. Initial Setup
Before any devices can be managed, an administrator must configure permission groups and device groups using the web portal.
Note: All steps in this section require a superuser account. A superuser has unrestricted access across all devices and groups and can create and manage permission groups and device scopes. Your organization's first superuser is provisioned during deployment. Refer to your Snapdragon Guardian Deployment Guide for instructions on initial superuser setup.
1.1 Permission Groups
Permission groups control which users can send which commands to which devices. Each permission group links:
- Users and User Groups: individual users or groups from the identity management system
- Permissions: the set of commands those users are allowed to run
- Owners: the users responsible for managing this permission group
To create a permission group via the portal:
- Navigate to Permission Groups in the left sidebar.
- Click New Permission Group.
- Enter a name and optional description.
- Under Owners, add the users who will manage this permission group.
- Under Users, add individual users to include.
- Under User Groups, search for and select the user groups to include.
- Under Permissions, select the permissions to grant.
- Click Create.
For programmatic access to permissions, see the API Guide.
1.2 Device Groups
Device groups are used to logically organize devices (for example, by department, location, or device model).
To create a device group via the portal:
- Navigate to Device Groups in the left sidebar.
- Click New Device Group.
- Enter a group name and optional description.
- Under Permission Groups, search for and select the permission groups that will govern this device group.
- Under Devices, click Add Devices to add devices to this group (optional at creation time).
- Click Create.
For programmatic access, see the API Guide.
2. Configure the Snapdragon Guardian CLI
The Snapdragon Guardian CLI (QRMS.exe) is used for all key management, harvesting, enrollment, and direct device interaction steps.
2.1 CLI Installation
The CLI is distributed through the Qualcomm Software Center.
After installation, the executable is located at:
C:\Program Files (x86)\Qualcomm\Qualcomm_RMS\QRMS.exeThe installer adds this directory to your PATH automatically. If QRMS.exe is not found on your PATH, add the directory manually or provide the full path in all commands below.
2.2 Generate and Import Config
Generate a template configuration file:
QRMS.exe Config --GenerateSampleConfigThis creates a config.json in your current directory. Open it and fill in the values for your deployment. For the full config field reference, see the CLI Reference Guide PDF included with the installation at C:\Program Files (x86)\Qualcomm\Qualcomm_RMS\.
Once filled in, import the config:
QRMS.exe Config --Import C:\config.jsonThe configuration is saved in the application for future use.
2.3 Verify Connectivity (Optional)
Start MQTT monitoring to confirm broker connectivity:
QRMS.exe MonitorPress Ctrl+C to stop. If the connection succeeds, the CLI will display broker connectivity status.
3. Onboard an OEM Key
An OEM key is a NIST P-521 ECDSA private key used to sign the enrollment trigger request. The corresponding OEM public key must already be present in the device license. The private key file must be in DER-encoded PKCS#8 format.
Run the following command on the admin machine to register the OEM private key in the Key Manager:
QRMS.exe OEMKey --AddKey "C:\Keys\oem_private.key"The key is registered in the Key Manager and will be used automatically when signing enrollment requests.
4. Harvesting
Harvesting is the process of obtaining the chipset public key from a device. This key uniquely identifies the device hardware and is required for enrollment.
The harvesting process involves two tools that must be present on the managed Windows device. Copy both tools before proceeding — they are also required for enrollment in section 5:
| Tool | Purpose |
|---|---|
QOMSWindowsTool.exe | Extracts the chipset public key; also queries device enrollment state |
QOMSEnrollTool.exe | Triggers enrollment and unenrollment |
Both tools are located in the build at:
<BUILD_LOCATION>\packages\ARM64\Release\QCOM\prebuilt\8480\app\Copy them to the device before proceeding.
4.1 Overview of the Harvesting Flow
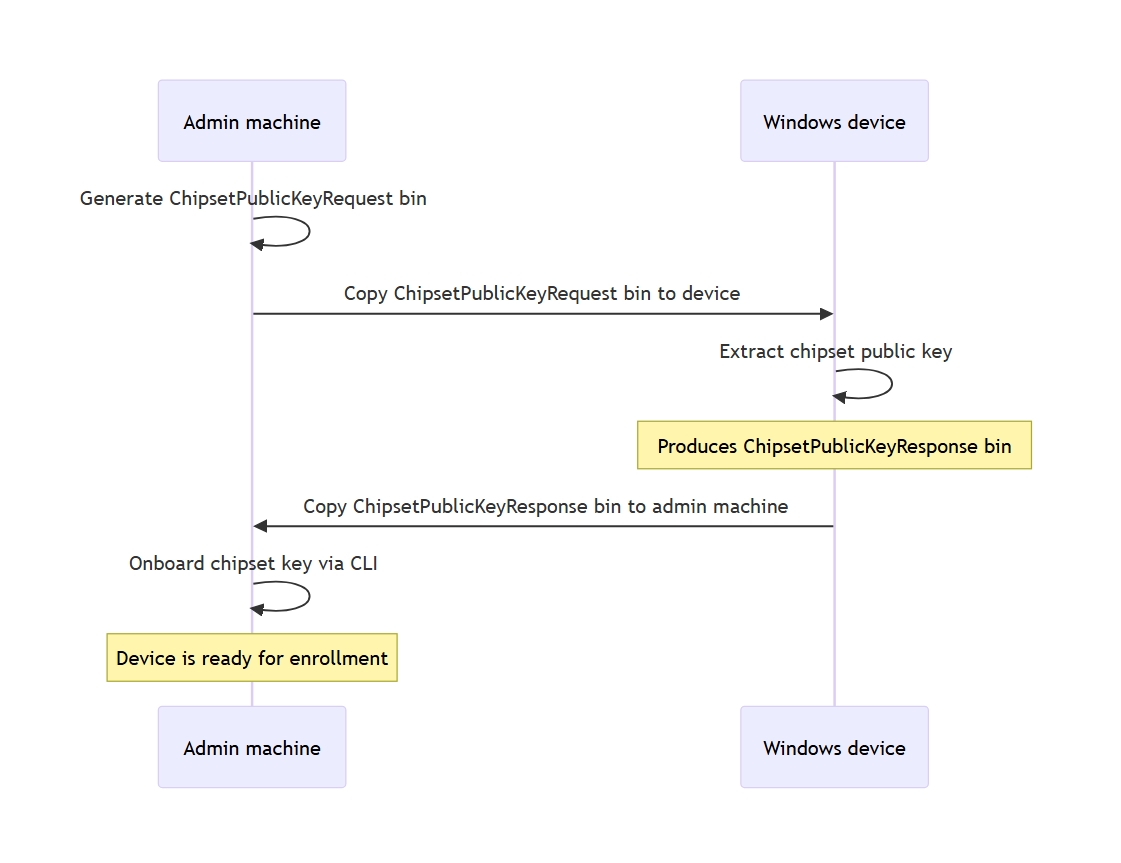
4.2 Step 1: Generate the Chipset Key Request
The --SaltFile parameter accepts a path to a binary file containing up to 16 bytes of random data used to salt the request. Generate a salt file with:
openssl rand -out C:\saltfile.bin 16Use the same salt file for all harvesting and enrollment operations on a given deployment. Devices enrolled with one salt cannot be re-harvested with a different one.
Run on the admin machine:
QRMS.exe Harvesting --GetChipsetKeyRequest --SaltFile C:\saltfile.binThis produces ChipsetPublicKeyRequest.bin in your temp folder:
C:\Users\<username>\AppData\Local\Temp\ChipsetPublicKeyRequest.binCopy this file to the Windows device before proceeding to the next step.
Parameters:
| Parameter | Required | Description |
|---|---|---|
--SaltFile | Yes | Path to a binary salt file (up to 16 bytes; generate with openssl rand -out saltfile.bin 16) |
4.3 Step 2: Extract the Chipset Key on the Device
On the target Windows device, run QOMSWindowsTool.exe with the request file generated in the previous step:
QOMSWindowsTool.exe /getpublickey -o unsigned -f ChipsetPublicKeyRequest.binParameters:
| Parameter | Description |
|---|---|
/getpublickey | Command to fetch the chipset public key from the device |
-o unsigned | Request packet type (unsigned is currently supported) |
-f <filepath> | Path to ChipsetPublicKeyRequest.bin generated in Step 1 |
On success, the tool writes ChipsetPublicKeyResponse.bin to the same directory as the tool. Copy this file back to the admin machine before proceeding to Step 3.
Tip: You can verify the device enrollment state at any time with:
QOMSWindowsTool.exe /getdevicestateReturn values:
1= Unenrolled,2= Disconnected,3= Ready.
4.4 Step 3: Onboard the Chipset Key
Run on the admin machine:
QRMS.exe Harvesting --OnBoardChipsetKey C:\ChipsetPublicKeyResponse.binThe chipset public key is registered in the Key Manager and associated with this device. The device is ready for enrollment.
5. Enrollment
Enrollment provisions the device with the MQTT broker credentials and TLS configuration it needs to communicate with Snapdragon Guardian.
5.1 Overview of the Enrollment Flow
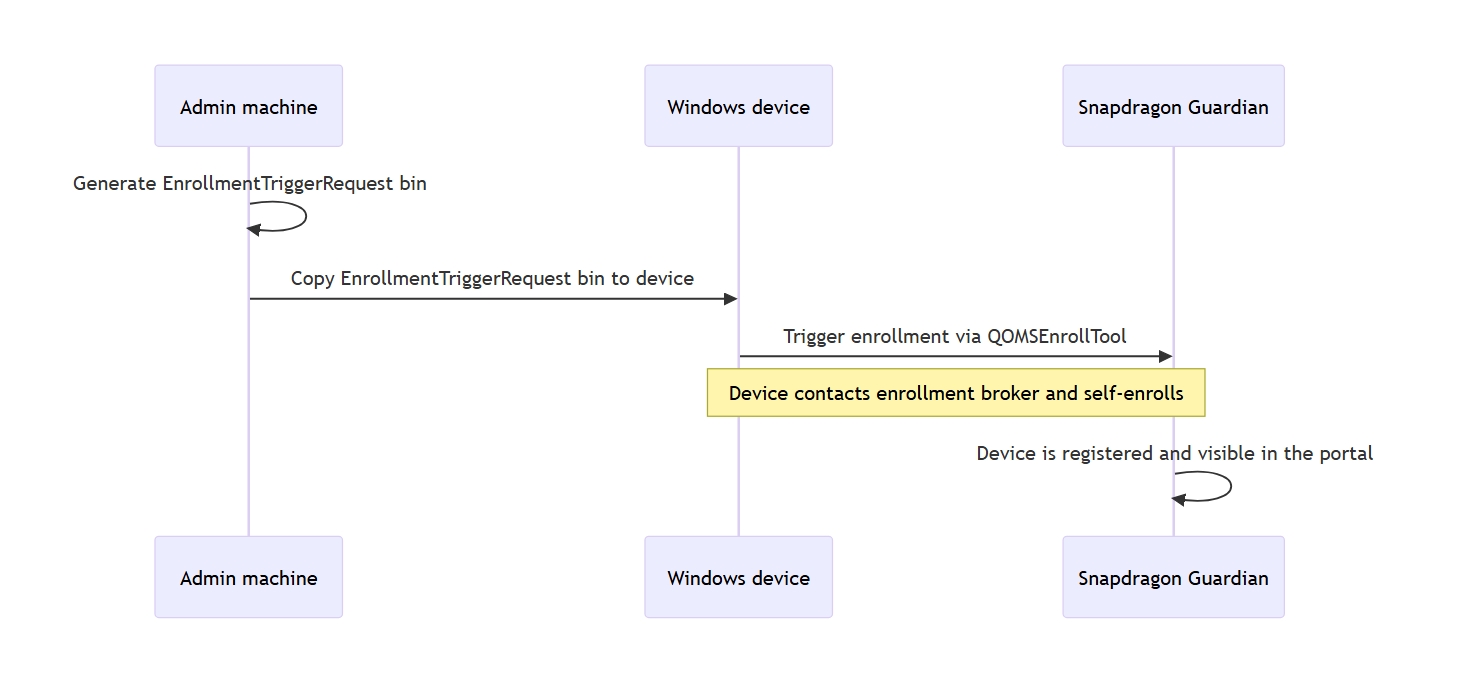
5.2 Step 1: Prepare Intermediate TLS Certificates (If Required)
Skip this step if your administrator has already provided a .der certificate file for your deployment.
If you need to extract the intermediate certificates from your enrollment server yourself, run the following on a Linux, macOS, or Windows (WSL) machine:
Download certificates from the enrollment server:
echo | openssl s_client -showcerts -servername enroll.example.com \
  -connect enroll.example.com:ENROLLMENT_PORT | \
  awk '/BEGIN CERTIFICATE/,/END CERTIFICATE/{ if(/BEGIN CERTIFICATE/){a++}; out="cert"a".pem"; print >out}'
Replace
ENROLLMENT_PORTwith the port provided by your administrator (typically443or8883).
Convert PEM files to DER format:
openssl x509 -in cert1.pem -outform DER -out cert1.der
openssl x509 -in cert2.pem -outform DER -out cert2.der
openssl x509 -in cert3.pem -outform DER -out cert3.der
Note:
cert1.deris the server leaf certificate; skip it. Pass the remaining intermediate certificates (e.g.,cert2.der,cert3.der) to the enrollment command.
5.3 Step 2: Generate the Enrollment Trigger Request
Run on the admin machine:
QRMS.exe Enrollment --GetSignedEnrollmentTriggerRequest ^
  --SaltFile C:\saltfile.bin ^
  --EnrollmentUrl enroll.example.com ^
  --EnrollmentPort ENROLLMENT_PORT ^
  --EnrollmentTopic enrollment ^
  --serverTlsCertificate C:\cert2.der
Note: If your CLI is configured with
AuthMode: Okta, this command opens a browser window to authenticate. Log in when prompted, then return to the terminal. The.binfile is generated after authentication completes.
This produces EnrollmentTriggerRequest.bin in your temp folder:
C:\Users\<username>\AppData\Local\Temp\EnrollmentTriggerRequest.binCopy this file to the Windows device before proceeding to the next step.
Parameters:
| Parameter | Required | Description |
|---|---|---|
--SaltFile | Yes | Path to the same binary salt file used during harvesting |
--EnrollmentUrl | Yes | Hostname of the enrollment MQTT broker (no https:// prefix) |
--EnrollmentPort | Yes | Port for the enrollment broker (typically 443 or 8883; use the value provided by your administrator) |
--EnrollmentTopic | Yes | Global public enrollment MQTT topic |
--serverTlsCertificate | No | Path to an intermediate DER-encoded TLS certificate (repeat the flag for multiple certs) |
5.4 Step 3: Trigger Enrollment on the Device
On the target Windows device, run QOMSEnrollTool.exe with the trigger file generated in the previous step:
QOMSEnrollTool.exe /enroll -o signed -f EnrollmentTriggerRequest.binParameters:
| Parameter | Description |
|---|---|
/enroll | Initiates device enrollment |
-o signed | Request type (signed is currently supported) |
-f <filepath> | Path to EnrollmentTriggerRequest.bin generated in Step 2 |
The tool communicates with the on-device enrollment subsystem to start the enrollment sequence and waits for completion.
After enrollment succeeds:
- The device is registered and available for management
- It appears in the portal under Devices
If enrollment fails, re-run with
-vto capture verbose output:QOMSEnrollTool.exe /enroll -o signed -f EnrollmentTriggerRequest.bin -vAlso check the device serial logs for enrollment errors. Common causes include:
- Device license not activated
- Salt mismatch between harvesting and enrollment
- Expired or incorrect TLS certificates
- MQTT enrollment broker unreachable
Contact your Snapdragon Guardian administrator if the issue persists.
6. Discover and Assign Devices
Once a device has enrolled, you can find it in the portal and assign it to a device group.
6.1 Find the Device
- Navigate to Devices in the left sidebar.
- Use the column filter icons in the table header to filter by:
- Device Name: the hostname reported by the device
- Serial Number: the hardware serial number
- The device entry displays: Device Name, Serial Number, Manufacturer, Model, OS, Device Group, Created On, and Last Message.
- Click the device name to open the Device Details view.
6.2 Assign a Device to a Group
- Navigate to Device Groups and open the target group.
- Click Edit.
- Under Devices, click Add Devices to open the device selection dialog.
- Select the device using the checkboxes and click Add Devices.
- Click Save.
7. Execute Commands
Once a device is enrolled and visible in the portal, you can send commands to it via the web UI or the CLI.
7.1 Via the Web Portal
- Open the Device Details page for the target device.
- Click the Command dropdown.
- Select the desired command (e.g., Get Location, Lock, Get System Info).
- Fill in any required parameters if prompted.
- Click OK to confirm.
- The command appears in the Commands tab with status
New, then transitions toPending. - Refresh or wait for the status to update to
Complete(orFailed/Error) when the device responds. - Click the command row to view the full response payload.
7.2 Via the CLI: Common Commands
Get system information:
QRMS.exe Send --DeviceId 0156187 --Command system --SystemRequest infoFor the full list of available commands and parameters, see the CLI Reference Guide PDF included with the installation at C:\Program Files (x86)\Qualcomm\Qualcomm_RMS\.
7.3 Via the CLI: Interactive Menu
For an interactive experience, use the menu mode:
QRMS.exe Menu --DeviceId 0156187This opens a numbered menu with all available commands. Enter the number for the desired operation and follow the prompts.
8. Unenroll a Device
Unenrolling removes the device from Snapdragon Guardian. The CLI sends an unenroll command to the device and waits for acknowledgment before removing it from the system. Use --Force if the device is offline and you need to remove it regardless.
Standard unenroll (waits for device acknowledgment):
QRMS.exe Devices --Unenroll 0156187Force unenroll (removes from system even if device does not respond):
QRMS.exe Devices --Unenroll 0156187 --ForceDevice-side unenroll (fallback only): Run this command directly on the device being unenrolled. Use it only if the device is not responding to Snapdragon Guardian commands:
QOMSEnrollTool.exe /unenroll -f unsign_unenroll.jsonThe .json file (unsign_unenroll.json) is included with the QOMSEnrollTool.exe application package.
After unenrollment:
- The device is removed from the portal
- Command history for the device is retained in the Snapdragon Guardian database for audit purposes
- The device's MQTT credentials are revoked
Additional Resources
- API Guide: common API request examples
- For support: https://createpoint.qti.qualcomm.com